Showing posts with label peppermint. Show all posts

Wednesday, January 22, 2014

Pinterest Project: Homemade Peppermint Coffee Sugar Scrub

After making so many gifts this Christmas (lotion bars, candy, body scrub, cocoa mix, etc) I realized that I didn’t really keep any for myself!  For shame.  So I rooted through my Pinterest boards and decided to give this coffee sugar scrub a whirl.

Why coffee?  The article states that just the smell of coffee can help perk you up in the morning (SO true), and the caffeine is good for your skin.  I took it a step further & used a coffee/chicory blend, because a) this is a Cajun food blog, and nothin’ screams “NOLA” like a cup of chicory coffee, and b) because chicory has some great skin health benefits of its own. It can be used to reduce swelling, it’s an anti-inflammatory, and it can help tighten your skin & reduce wrinkles, while increasing collagen synthesis.

IMG_3898


Ingredients:

1 cup white sugar

5 Tbsp coffee grounds (I used Community Coffee’s New Orleans Blend w/Chicory)

1/8 - 1/4 cup oil (I used coconut oil, but you could just as easily do almond oil, olive oil, etc.)

2 tsp of extract or essential oils, your choice.  The Pinterest recipe recommends peppermint & vanilla to help wake you up, which I really like.  You could also use almond, coconut, etc.


DIRECTIONS:

Combine the sugar & coffee in a small bowl & mix well.  Then add your extracts (I used peppermint & vanilla), and slowly add the oil.  You may not need to use the whole 1/4 cup.  Just add enough til you get all the grains coated & it will hold together.  Beyond that, it’s up to your personal preference.  If you accidentally add too much, just mix in a little more sugar and/or coffee.

Transfer to a sealable jar (I save old pickle & olive jars & keep them in my pantry for projects like these—just clean them out really well), and voila—you’re done!

IMG_3896

NOTE:  The coffee grounds will leave a bit of a mess in your shower, so just be prepared for that.  If you have a detachable showerhead or a handheld shower head, it’ll clean up really easily.

Thursday, February 14, 2013

Valentine’s Thirsty Thursday: Peppermint Marshmallows & Hot Chocolate!

Happy Valentine’s Day, peeps!  I know this tends to be a sore topic for those who are single…but I’m married, and I have a super amazing husband, and I’m not ashamed of that.  Especially since my extra special Cupid knows the way to my heart--- BACON ARROWS.

vday Love is delicious.  And smoky.

Our Valentine’s plans are still a little up in the air, but we do have one thing nailed down: A Good Day To Die HardBecause Bruce Willis blowing stuff up is TOTES romantical.  (Earlier this week, I got to purchase us a Groupon for a couple’s massage.  We are all about balance.)

But where was I?  Oh yes.  Thirsty Thursday.  Today’s treat is non-alcoholic, but you could absolutely add a shot of Bailey’s or Godiva liqueur in there to spice things up a bit.

vday 001

Yes, yes.  These were both Pinterest projects.  And I crammed them together.  I actually used these as Christmas gifts for coworkers, but it would totally work as a nice Valentine’s gift for family, teachers, coworkers, etc. 

And if you’re single today, and don’t have any plans, then feel free to pamper yourself.  Have dessert first, take a relaxing detox bath with a glass of champagne, listen to some Norah Jones, crawl into your favorite PJ’s, then curl up on the couch with your favorite blanket, a cup of spiked cocoa with extra marshmallows, and pop in your favorite anti-VDay movie.

Seriously.  You WANT the cocoa… it’s delicious.  The marshmallows were heavenly.  They melted so well in the chocolate and just made a delicious, creamy layer on top, and the peppermint extract infiltrated down into the hot chocolate…it was fantastic.

But word to the wise:  Making these marshmallows is a TWO person project.  Otherwise you WILL end up a sticky mess.

IMG_0118

But first: The hot chocolate mix.

Ingredients: (makes 8-10 gift bags, or 20 servings)

3 cups nonfat dry milk powder (I recommend Carnation—the generic brand can be a little chalky)

2 cups powdered (icing) sugar

1.5 cups cocoa powder (stick with the traditional—I’ve tried it with Hershey’s dark and it was a little bitter)

3/4 cup white chocolate chips

3/4 cup semisweet chocolate chips (if you wanted your cocoa to be flavored, you can replace this with mint chips, cinnamon chips, caramel chips, etc.)

1/2 tsp salt

cone-shaped treat bags


Directions:

Mix all the ingredients together in a large bowl.  Then move half the mixture into a food processor and pulse until the chocolate chips are finely chopped.  Repeat with the second half of the batch. 

Transfer about 3/4 to 1 cup of the mix into a treat bag, then set aside. 


Now…The MARSHMALLOWS!!!

Ingredients: (makes about 80-100, depending on your cutting skillz)

butter (to grease your pan) & a 9 x 13 pan

1/3 cup powdered sugar

2.5 Tbsp unflavored gelatin (like Knox)

1/2 cup cold water

1.5 cups granulated sugar

1 cup light corn syrup

1/4 tsp salt

1/2 cup water

1 tsp pure peppermint extract

8-10 drops of red food coloring


Directions:

Grease your 9x13 pan (glass preferred—it’ll clean up easier) with butter, and then dust the pan with a tablespoon of powdered sugar to coat.  This will allow the marshmallows to come out of the pan easily when you’re ready to cut them.

Then, in the bowl of a stand mixer (yes, you REALLY do need a stand mixer—this stuff gets SUPER thick and has to be beaten for about 8 minutes), sprinkle gelatin over 1/2 cup cold water to soften.

In a 2-quart saucepan, heat the sugar, corn syrup, salt, and 1/2 cup of water over low heat and stir until dissolved.  Then heat to boiling, and cook WITHOUT STIRRING for about 30 minutes or until the mixture reaches 240F (soft ball stage).  If you don’t have a clip for the side of your pot to hold the thermometer in place, you can fashion one out of tin foil. (make sure the tip of the thermometer isn’t touching the bottom of the pan or you’ll get a false reading.)  Once you hit 240F, remove from heat.

IMG_0100  IMG_0101


Now, slowly pour your sugar-syrup into the bowl of softened gelatin while beating on low speed. Once it’s all added, increase the speed to high and beat 8 to 10 minutes or until mixture is white and has almost tripled in volume. Then add the peppermint extract and beat on high speed for one additional minute.

HERE’s WHERE THE SECOND PERSON COMES IN:  One person needs to hold the mixing bowl over the 9x13 pan.  The other, using a spatula and wet hands, will scrape the marshmallow “fluff” into the pan.  It is EXTREMELY STICKY.  If you touch the “fluff” with non-wet hands, or with a non-wet portion of your body (say, arm)…it WILL stick, and you’ll have stringy bits of marshmallow decoration all over you and your kitchen.  Once you’ve gotten as much out of the bowl as you possibly can, pat the “fluff” into the pan with WET hands to spread it out.

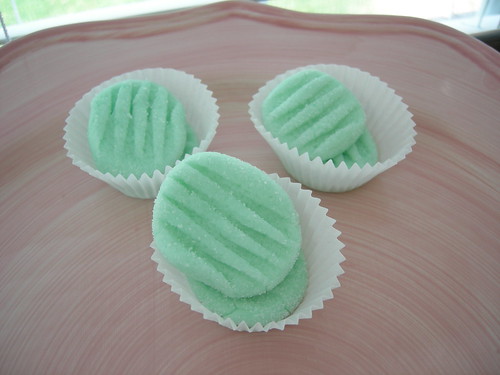
Now, drop red food coloring randomly onto top of marshmallow mixture and pull a wet or greased butter knife through food color to create swirl pattern over top. Let stand uncovered at least 8 hours or overnight.

IMG_0104

Now… dust a large cutting board with powdered sugar, and turn out the marshmallow onto the cutting board.  Place a bowl with 1/2 cup of powdered sugar off to the side.  Use a pizza cutter to cut the marshmallow into strips (you’ll periodically have to re-grease the wheel) and then cut each strip into 1-inch cubes.  Drop the cubes into the bowl of powdered sugar and toss—this will keep them from sticking to each other, and to you.

IMG_0117

Now—back to your hot cocoa bags.  Place about 6-8 marshmallows in each bag, then twist shut, and decorate as you choose.  Since we did these for Christmas, I used green ribbon & holly berries, but for V-Day you could do shades of red, white & pink.  Print out some instructions (1/4 cup cocoa mix + 1 cup milk + 2 marshmallows) and use patterned scissors for sassy flair.

NOTE:  These marshmallows make a FANTASTIC S’more.  If you’re going to have a romantic fire going in the fireplace, bust out some marshmallows and grahams! :D

IMG_0126

Wednesday, September 5, 2012

Meltaway Cream Cheese Mints

How did I forget to post this recipe when I was doing my Ultimate Wedding Week countdown?  It would’ve fit in so perfectly.  Alas, I am imperfect.
Nary a worry!  Here I am to rectify the situation and introduce you all to the amazingly awesomeness that is: The Cream Cheese Mint.
These lil’ beauties are a tradition at my family weddings.  So of course, I HAD to have them at my own wedding last year. In my wedding colors, natch.  And I had just gotten a Kitchenaid from my parents as a pre-wedding gift…so it ONLY made sense to bust it out & spend three evenings cranking out hundreds of tiny mints.
Of course, we then somehow managed to completely FORGET to put them out at the reception.  300+ mints.  That my bridesmaid Babsy & I slaved over.  Completely forgotten.  Lost in the freezer behind the ice cream for the root beer floats.  It pains me, even to this day.
So, after the reception, my new hubby & I had all the extra “stuff” that wasn’t eaten at the wedding.  Ice cream, sandwiches, cupcakes, meatballs, fruit, and a quarter-ton of mints.  We started putting them on EVERYTHING.  Including the leftover ice cream.
IMG_0016 Tastes like love.
If you’re not cranking out hundreds of the lil’ buggers, they are actually ridonkulously easy to make. Only a few ingredients, a good mixer, and some mint molds are needed.  Technically, you don’t even need the mint molds—you can also just pat them flat, smash with a fork (a la PB cookie-style), or use small cookie cutters.  You can get plastic candy molds like these from on Amazon or at your nearest craft store for just a few bucks. 
mint molds
I also had some silicone molds that I borrowed from my aunts.  There are TONS of designs available; my aunts had some for Christmas, baby showers, graduations, etc.

I stuck with making green leaves, blue roses, and threw in some white fleur-de-lis for good measure.

Ingredients: (this will make about 5-7 dozen mints)
1 package (3 ounces) fat free cream cheese or Neufchatel, room temperature
1/4 teaspoon peppermint extract
food coloring (enough to get your preferred shade)
4 1/4 to 4 1/2 cups powdered sugar
Granulated sugar

Directions:
NOTE: if you want to make a couple different colors, just make half of a batch at a time.  Or you can make a plain white batch and then add your food coloring at the end, though it’s sometimes hard to get the color incorporated as well at the end…however, it can produce a really cool marbling effect, so that’s also a fun option!
Place your cream cheese & extract in a mixer and blend until smooth and the extract is well incorporated.  (Note: A stand mixer, such as a Kitchenaid, will make this recipe SUPER easy, since you can leave the beater running while you incorporate ingredients.) 
Add your food coloring.  Depending on what color you’re going for, this could be a lot, or not very much.  For the green you see above, I only had to use a few drops per batch.  However, I wanted a really rich blue for the roses, so it took considerably more food coloring to get it beyond a “baby shower blue” color.
Now, start adding your powdered sugar—about 1/2 cup at a time, in order to avoid the “there’s sugar everywhere and my kitchen looks like a meth lab” effect.  Your “dough” is ready once it’s firm and no longer sticky.  If it’s still sticky after 4.5 cups…add some more sugar.  You should be able to pull off a piece & roll it into a ball without it sticking to your hands, though it may still be slightly tacky.
Set up a “sugarcoating” prep station.  about 1/2 cup of granulated sugar in a small bowl will work.
Hygiene Note: You’re going to be handling this stuff with your paws, so now’s a good time to wash your hands.  With SOAP. 
Scoop out a small piece of the “dough”—the amount you need will depend on the size of your.  You’ll sort it out as you go; it might take a couple tries to guesstimate it right.  Roll it into a ball, and then drop that ball into your “sugarcoating” bowl.  Roll it around until it’s fully coated, and then press it into your mold.  The sugar on the outside keeps the mint from sticking to the mold, so be sure it’s fully coated.

Now, repeat like 59-83 times.

And the GREAT news?  These freeze perfectly.  You can make them up to a month in advance.  Then, on the day of your event, just take them out of the freezer that morning.

As you know, I was a wedding-crazed bride while I was making these…so I don’t have a ton of pics, since I wasn’t in “blogger mode”.  So instead, I’ve perused the interwebs for some fun examples of mints you can make using this basic recipe.
Fall is coming up, so some of these would be super cute:

This would be some of that marbling I mentioned above. 
Or, if you don’t have mint/candy molds, you can also just lightly smash the sugared dough ball with a fork to make these simple lovelies:


Another option if you don’t have mint/candy molds would be rolling the dough out, lightly dusting with sugar, and then using small cookie cutters, like this example:

Love those colors!!!

And THESE are simply gorgeous, if you’re really adventurous.  The creator used buttons to create their own silicone molds.  These would just be PERFECT for a vintage style wedding.


MINTY DINO’S!!!!  Love.

Are there any interesting traditions your family has at weddings?  I would love to hear about them!