Showing posts with label cream cheese. Show all posts

Tuesday, April 29, 2014

Bacon & Boudin Wrapped Jalapeno Popper

This is the brain-child of myself & my coworker J.  When J started at our office, it was a few weeks before we realized we shared something in common—LOUISIANA.  His wife’s family was from Abbeville (just south of where I lived in Lafayette, if you’re not familiar with the area). What a coinky-dink!  We quickly became friends as we reminisced over our favorite Louisiana restaurants & watering holes.

We also periodically drift into discussions of our favorite make-at-home Southern favorites, which includes jalapeno poppers.  Which we of course had to take to the next level.  Boudin-filled jalapenos?  No… WRAP the popper in boudin, and THEN wrap it in bacon!

The other day, J stopped at my cubicle, absolutely giddy, and said, “I have something for you.”

boudin

Yup.  Authentic Louisiana boudin from Richard’s (pronounced “Ree-shards, for non-locals).  J definitely won Friend of the Week.

So of course, I had to take it home, and test out our idea.

Our delicious, delicious, overkill of an idea.

IMG_4787

INGREDIENTS: (makes two servings)

1 link smoked boudin, split in two

2 large jalapenos, deseeded & caps removed

2 tbsp fat free cream cheese

4 slices low-sodium bacon


DIRECTIONS:

Pre-heat the oven to 400F.

Lightly char the outsides of the jalapenos over a burner (this way the jalapenos aren’t too crunchy in the end product). Place the cream cheese into a baggie, then clip off a corner & pipe the cream cheese into the pepper.

Slice the boudin long-wise and press gently so that there’s a pocket inside.  Leave the casing on to help hold it together.

IMG_4767

Face the open end of the jalapeno toward the closed end of the boudin link—it’ll help keep the cream cheese from leaking out.

Close the boudin around the jalapeno as much as possible, and then use the bacon to bind it together.  It’ll take two slices per roll.

IMG_4779

Bake on a foil-lined parchment for 20-25 minutes (or a grill for the same amount of time), or until the bacon is crisp & browned.  Let cool for about 5-10 minutes, then dig in!

IMG_4791

This ended up being a celebratory meal, as I came home & found out that I PASSED MY ASBOG EXAM—so I get to apply for my license to be a Registered Geologist!!!!


NUTRIFACTS:

Calories: 410

Fat: 19.5 g

Fiber: 0.8g

Carbs: 30g

Sodium: 890 mg

Protein: 23.6g

Tuesday, May 7, 2013

The Loozy-Anna Dawg: Andouille w/Cream Cheese & Pepper Jelly

We’ve been doing some “market research” as of late, testing out different recipes for possible use at the shop.  Because we’re more than just ice cream.  We have sandwiches and hot dogs and smoothies as well.

I’m not really sure where the inspiration for this came from…I think I was just trying to think of something “different” that would go well on an andouille link, but not require a huge heap of extra product on our part.  A “jambalaya dog” or a “red beans” dog both sound fantastic and I have no doubt they’d be completely deelish… but it would also require us (i.e. ME) to find the time to cook up batches at home for them to use at the shop, because we don’t have a stove top at the ice cream parlor.

And then, I had an epiphany.

If you’ve ever been to a party in the south, you’ve probably seen this included in the spread:

A true classic.  No Southern party is complete without a brick of cream cheese smothered in Tabasco pepper jelly (or homemade pepper jelly, if you’re that advanced).  I thought it was completely weird and looked disgusting when I first moved to Louisiana.

And then…I tried it.  And probably ate half of it all myself.  I was completely hooked.  I’m not usually huge on cream cheese, but in this combination, there’s no better pairing.  The sweet-hot bite of the pepper jelly is balanced perfectly by the silky smoothness of the cream cheese.  Add the crisp, salty crackers, and you’re just in heaven.

So…why not try it on a hot dog? But of course, not a regular hot dog.  No.  That’s just silly. We need an andouille link to make this properly.

dog

Ingredients:

Johnsonville Andouille New Orleans Style Sausage links (or more authentic andouille links if you can get them, but I like the Johnsonville since they’re close in size to a regular hot dog & have good flavor)

Hot Dog buns

Light Cream Cheese (about 2 teaspoons per sausage)

Tabasco pepper jelly (or other brand if you can’t find Tabasco, but the Tabasco texture is much more smooth & less “jelly-like”… compare the photo of the dip to the photo of the dog—I had to use Reese’s brand for this demo because I couldn’t find Tabasco brand) – also about 2 tsp per sausage


Directions:

Grill the andouille links for a nice smoky flavor, and toast the buns if you have the option.

Scoop a couple tablespoons of cream cheese into a ziploc bag and squeeze down into one corner of the bag; then snip off the corner to use it as a piping bag.  Do the same for the jelly.

Drizzle the cream cheese & the jelly across the sausage link.

Devour.


I was pretty impressed with this concoction.  The flavor on the Johnsonville sausage is really wonderful; a good amount of spice without being overkill.  And the cream cheese & jelly combo, mixed with the saltiness of the sausage made a really wonderful combination.  My husband who is a spicy-food-fanatic, thought it wasn’t quite spicy enough, but I thought it was about perfect for most taste buds—however, if you have a hot food freak in your house, you could always throw a few jalapeno slices on there as well for more heat (and a pretty color combo to boot).


Serve with a side of Zapp’s chips, or a nice salad.


NutriFacts (per dawg):

Calories 412.5

  Total Fat 24.9 g

  Saturated Fat 9.1 g

  Polyunsaturated Fat 0.0 g

  Monounsaturated Fat 0.0 g

  Cholesterol 55.6 mg

  Sodium 1,018.8 mg

  Potassium 0.0 mg

  Total Carbohydrate 33.0 g

  Dietary Fiber 2.0 g

  Sugars 13.3 g

  Protein 13.8 g

Monday, December 10, 2012

Overnight Stuffed French Toast, of the Blackberry Variety.

Back in July, my mom hooked me up with a flat of blackberries.  We froze about half of those, so we’ve got a nice stockpile in the freezer still.  So when I saw a recipe on Pinterest for Overnight French Toast….yeahhhh….the pic might SHOW blueberries, but I had blackberries on the brain.  Nothing against blueberries, mind you.  But I don’t have a stockpile of fresh-frozen BLUEberries, now do I?  But seriously---this would be awesome with whatever berries you have on hand: strawberries, cherries, raspberries…heck, I think you could even attempt this with gooseberries, though you might want to add some extra sugar in that situation.

This recipe was nicely simple.  Just perfect for a weekend.  I prepped everything up on Friday night, woke up after a nice sleep-in, popped it in the oven, had my morning coffee, read for a bit, played around on Facebook, and then by the time the Hubs roused himself, breakfast was ready!

Oh…and it was DEELISHUSSSS.

IMG_2681

Ingredients:

12 slices French bread, cut into 1 inch cubes
1 (8 ounce) package fat free cream cheese, cut into 1 inch cubes
1 cup fresh blackberries
6 eggs, beaten
2 cups skim milk
1 teaspoon vanilla extract
1/3 cup maple syrup
1 tsp cinnamon
1 tsp nutmeg  
3/4 cup white sugar
2 tablespoons cornstarch
1 cup water
1 cup fresh blackberries
1 tablespoon light butter

Directions:

Lightly coat a 9x13 pan with cooking spray, and then place half of the bread cubes into the pan.  Place half the blackberries on top of that, then add the cream cheese cubes.  Cover that with the remaining bread and berries.

IMG_2659

In a large bowl, beat the eggs, then add the spices, milk, vanilla, and syrup.  Pour over the pan evenly, cover, and place in the fridge until the morning.


The next morning, heat your oven to 350F, remove the pan from the fridge and let it sit for a bit (20-30 minutes) to come closer to room temp.  Then place in the oven for 30 minutes while covered with foil.  After 30 minutes, remove the foil and let finish cooking until the center is firm and the top is lightly browned.

While that’s cooking, we need to make a sauce for the top.  So in a small sauce pan, mix the sugar, cornstarch, and water and bring to a boil. Stirring constantly, cook 3 to 4 minutes. Mix in the remaining 1 cup blackberries.  Then reduce heat and simmer  for about 10 minutes or until the berries burst.

IMG_2672

Stir in the butter, and pour over the baked French toast.

IMG_2676

Serve warm and dig in!


IMG_2686

Makes 12 servings.


NutriFacts:

Calories 249.0

  Total Fat 4.0 g

  Saturated Fat 1.1 g

  Polyunsaturated Fat 1.0 g

  Monounsaturated Fat 1.5 g

  Cholesterol 96.7 mg

  Sodium 386.2 mg

  Potassium 207.8 mg

  Total Carbohydrate 42.5 g

  Dietary Fiber 2.2 g

  Sugars 22.2 g

  Protein 10.3 g

Wednesday, September 5, 2012

Meltaway Cream Cheese Mints

How did I forget to post this recipe when I was doing my Ultimate Wedding Week countdown?  It would’ve fit in so perfectly.  Alas, I am imperfect.
Nary a worry!  Here I am to rectify the situation and introduce you all to the amazingly awesomeness that is: The Cream Cheese Mint.
These lil’ beauties are a tradition at my family weddings.  So of course, I HAD to have them at my own wedding last year. In my wedding colors, natch.  And I had just gotten a Kitchenaid from my parents as a pre-wedding gift…so it ONLY made sense to bust it out & spend three evenings cranking out hundreds of tiny mints.
Of course, we then somehow managed to completely FORGET to put them out at the reception.  300+ mints.  That my bridesmaid Babsy & I slaved over.  Completely forgotten.  Lost in the freezer behind the ice cream for the root beer floats.  It pains me, even to this day.
So, after the reception, my new hubby & I had all the extra “stuff” that wasn’t eaten at the wedding.  Ice cream, sandwiches, cupcakes, meatballs, fruit, and a quarter-ton of mints.  We started putting them on EVERYTHING.  Including the leftover ice cream.
IMG_0016 Tastes like love.
If you’re not cranking out hundreds of the lil’ buggers, they are actually ridonkulously easy to make. Only a few ingredients, a good mixer, and some mint molds are needed.  Technically, you don’t even need the mint molds—you can also just pat them flat, smash with a fork (a la PB cookie-style), or use small cookie cutters.  You can get plastic candy molds like these from on Amazon or at your nearest craft store for just a few bucks. 
mint molds
I also had some silicone molds that I borrowed from my aunts.  There are TONS of designs available; my aunts had some for Christmas, baby showers, graduations, etc.

I stuck with making green leaves, blue roses, and threw in some white fleur-de-lis for good measure.

Ingredients: (this will make about 5-7 dozen mints)
1 package (3 ounces) fat free cream cheese or Neufchatel, room temperature
1/4 teaspoon peppermint extract
food coloring (enough to get your preferred shade)
4 1/4 to 4 1/2 cups powdered sugar
Granulated sugar

Directions:
NOTE: if you want to make a couple different colors, just make half of a batch at a time.  Or you can make a plain white batch and then add your food coloring at the end, though it’s sometimes hard to get the color incorporated as well at the end…however, it can produce a really cool marbling effect, so that’s also a fun option!
Place your cream cheese & extract in a mixer and blend until smooth and the extract is well incorporated.  (Note: A stand mixer, such as a Kitchenaid, will make this recipe SUPER easy, since you can leave the beater running while you incorporate ingredients.) 
Add your food coloring.  Depending on what color you’re going for, this could be a lot, or not very much.  For the green you see above, I only had to use a few drops per batch.  However, I wanted a really rich blue for the roses, so it took considerably more food coloring to get it beyond a “baby shower blue” color.
Now, start adding your powdered sugar—about 1/2 cup at a time, in order to avoid the “there’s sugar everywhere and my kitchen looks like a meth lab” effect.  Your “dough” is ready once it’s firm and no longer sticky.  If it’s still sticky after 4.5 cups…add some more sugar.  You should be able to pull off a piece & roll it into a ball without it sticking to your hands, though it may still be slightly tacky.
Set up a “sugarcoating” prep station.  about 1/2 cup of granulated sugar in a small bowl will work.
Hygiene Note: You’re going to be handling this stuff with your paws, so now’s a good time to wash your hands.  With SOAP. 
Scoop out a small piece of the “dough”—the amount you need will depend on the size of your.  You’ll sort it out as you go; it might take a couple tries to guesstimate it right.  Roll it into a ball, and then drop that ball into your “sugarcoating” bowl.  Roll it around until it’s fully coated, and then press it into your mold.  The sugar on the outside keeps the mint from sticking to the mold, so be sure it’s fully coated.

Now, repeat like 59-83 times.

And the GREAT news?  These freeze perfectly.  You can make them up to a month in advance.  Then, on the day of your event, just take them out of the freezer that morning.

As you know, I was a wedding-crazed bride while I was making these…so I don’t have a ton of pics, since I wasn’t in “blogger mode”.  So instead, I’ve perused the interwebs for some fun examples of mints you can make using this basic recipe.
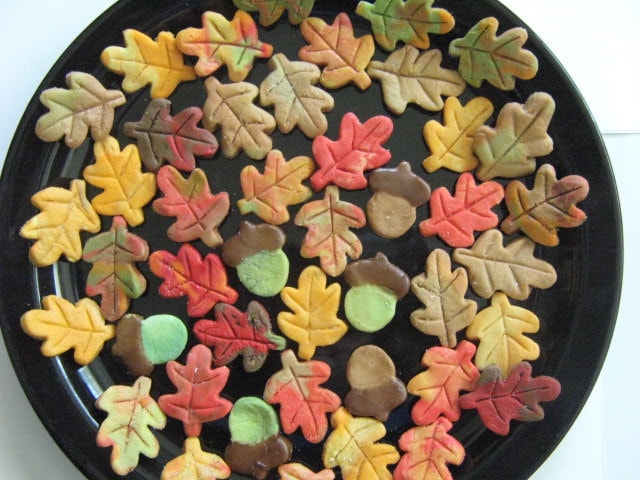
Fall is coming up, so some of these would be super cute:

This would be some of that marbling I mentioned above. 
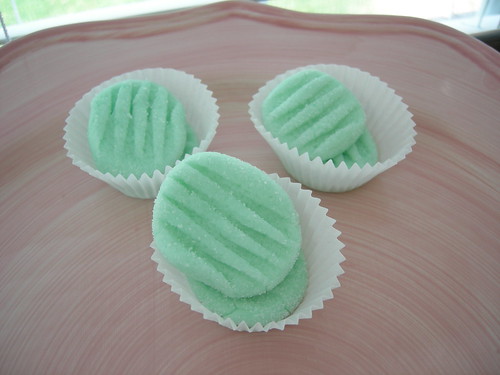
Or, if you don’t have mint/candy molds, you can also just lightly smash the sugared dough ball with a fork to make these simple lovelies:


Another option if you don’t have mint/candy molds would be rolling the dough out, lightly dusting with sugar, and then using small cookie cutters, like this example:

Love those colors!!!

And THESE are simply gorgeous, if you’re really adventurous.  The creator used buttons to create their own silicone molds.  These would just be PERFECT for a vintage style wedding.


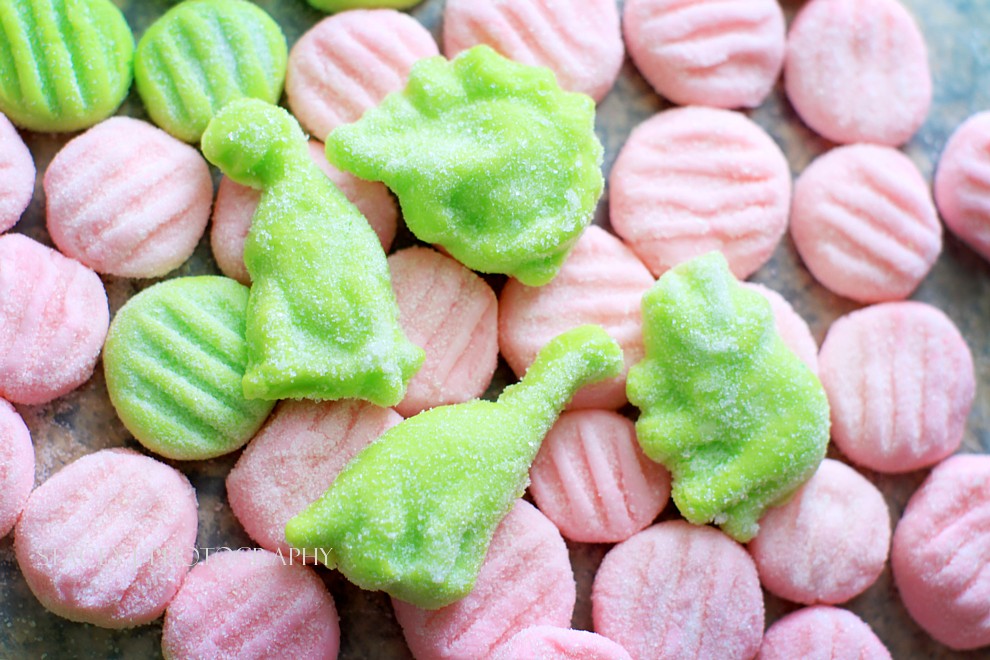
MINTY DINO’S!!!!  Love.

Are there any interesting traditions your family has at weddings?  I would love to hear about them!

Sunday, May 20, 2012

Crawchos!!! (aka Crawfish Nachos)

This is an invention of my cousin Primo’s, that he dreamed up back in the day when we were still roommates in Lafayette.  Of course, back then, it was just an idea, a loose concept.  But since that time, Primo’s had a chance to perfect it into a pretty tasty dish.  And while I was down in Louisiana for work last week, he was cool enough to teach me his recipe.  This makes a pretty big batch, so it’s great for a party, and a great way to use up leftover crawfish tails after a boil!
IMG_0742

Ingredients: (this has been slightly health-i-fied from the original)
32 oz block of Velveeta (2%), cubed
8 oz fat free cream cheese, cubed
14 oz can sweet corn, drained
2 tbsp jalapeno slices, diced
1 tbsp Cajun seasoning
10 oz can of Mexican Rotel, drained
4-6 oz light beer (I’ll recommend Abita Light to keep it Cajun)
1 lb crawfish tails (preferably leftover from a crawfish boil so they have some good spice)
1 tbsp dry Crab Boil seasoning
Tortilla chips
Sliced green onions or cilantro (optional—we didn’t have them, but I think it would make a nice garnish & add another pop of flavor)

Directions:
In a large skillet, heat the corn over medium-low heat & season with the Cajun seasoning.  Stir occasionally.  This is to pull some of the moisture out of the corn, to give it a crunchier texture.  After about 5 minutes, add the jalapenos & continue to stir.
IMG_0734
P.S.  Now’s a good time to have one of these:
IMG_0738
(My favorite time of year—Strawberry Lager season!)
And of course, what’s an episode of FeauxCajun Kitchen without some canine sous chefs?
IMG_0731
(“Furreals Dad…just ONE piece of cream cheese.  But don’t try stickin’ that heartworm pill in there again. I’m on to your schemes.”)
In a large pot, combine Velveeta, cream cheese, rotel, crab boil seasoning, and beer over medium heat. 
IMG_0732
Stir periodically until smooth & creamy, then add crawfish & corn mixture.
IMG_0735
Continue to cook until crawfish are heated through, stirring frequently to make sure the bottom doesn’t scorch.
IMG_0739
Arrange your chips on a plate and then pour the crawfish cheese sauce over the chips.
IMG_0741
Proceed to chow down!!!

Nutrifacts (makes 12 servings):
Calories 370.2
  Total Fat 13.7 g
  Saturated Fat 6.3 g
  Polyunsaturated Fat 1.0 g
  Monounsaturated Fat 2.9 g
  Cholesterol 88.0 mg
  Sodium 1,869.9 mg
  Potassium 359.8 mg
  Total Carbohydrate 34.0 g
  Dietary Fiber 2.4 g
  Sugars 8.1 g
  Protein 26.7 g