Showing posts with label around the house. Show all posts

Thursday, November 7, 2019

Bathroom Remodels!

Over the past 6 months, we've been doing some updating to the bathrooms in our house. Now that everything's wrapped up it seemed like a good time to share!


Guest Bathroom:
This bathroom has a really nice jetted tub (not shown)--no improvements needed there, except that the overflow drain is a little low and doesn't let the tub fill up enough to really soak, so we bought this drain cover to fix that problem.  Wall and trim paint were already great too, very beachy.

But it had NO storage.  Granted, it's a guest bath, but you still need SOMETHING for towels, toiletries, a bathroom bag, etc.  And the pedestal sink didn't leave much space for setting things out either.

So we pulled out the pedestal sink (sold it in a garage sale), and replaced it with this cabinet style sink.  The faucet was good, just needed a vinegar soak to get rid of some calcium buildup.  We also added a small shelf in the corner.

The paint on the mirror was chipping, so I got this gorgeous mirror at Hobby Lobby for 50% off (waited for Decor to be on sale).  And we replaced the light fixture with one from a set we got at Menards on Black Friday (the matching towel bar, toilet paper holder, and hand towel hook went upstairs in the master bath). Added a beachy turtle painting from a V.I.Paint class I went to a couple years ago.

Total Cost: $190


Master Bathroom (aka The Hubs' Bathroom):
Yes, we have separate bathrooms. It's the secret to a happy marriage, I promise you. Well...one of the secrets, along with open communication and trust.

Here, we liked light fixture...but that's about it.  The molded solid surface countertop had a gouge and a crack in it, and the room really needed an update.  We looked into just swapping out the countertops, but since the sink isn't centered, we were going to have to have something custom-cut.  We went down to the Home Show to get ideas...and that's where we met Brandy & Jared with Over The Top Resurfacing.  If not for going to that event, we would never have even realized that this is a thing!  Did you know?  They cover your existing counters with a durable spray-on porcelain enamel. Five year warranty.  And there are SO. MANY. COLORS.   That was literally the hardest part--picking the colors.  They did a free estimate, and the winner was obvious:


Manufactured Quartz $2600 (2 sinks)
Cultured Granite $660 (one sink)
Corian Solid Surface $500 (one sink)
Resurfacing $1300 (both countertops AND showers)

Doing something with the showers hadn't really even been on our radar. But once we realized we could get it ALL done for half the price of quartz, it seemed too perfect. My shower was in OK condition, but The Hubs' had some staining on the floor that we couldn't get rid of.
We opted for Latte on the countertops, and Cappucino in the showers.  I would have loved to do the Latte in the showers as well, but the lighting in our showers isn't great, so a dark wall color just doesn't work, unless you like not being able to see while you shave.
It was a 2 day process, and they took care of everything.  We just removed the faucets and cleaned the counters the night before.  I worked from home so I could be here if they needed anything.  It's a 3 stage process--a base color first, then they do the speckled part that makes it look like stone, and then a clear sealant on top.  48 hours of cure time (so we used the downstairs guest bathroom during that time).  
Then we swapped out the faucet, and the wall hardware (towel bar, etc.) so that it would match the bronze light fixture.
And The Hubs painted the cabinets, and added knobs that matched the bronze fixture and wall hardware. (I helped pick out the paint color.  I was useless after that.)
Last, The Hubs bought some wood trim and painted it the same color as the cabinets, glued it to the mirror & clamped it on until dry.  It really helped elevate the look of the mirror.

Total Cost: $780


My Bathroom

My bathroom is pretty small (it's the main floor hall bathroom) and I share it with the kiddo.  But it works just fine.  
Panorama Shot from Before.

As mentioned above, we got the counter and the shower resurfaced, and The Hubs repainted the cabinet and added the mirror trim in this bathroom as well. 


Totally looks like stone. I love it.

Lighting: The vanity light above the sink was gorgeous so no updates needed there, and it has a window so there's some nice natural light if needed.  The bathroom had a fan, but no overhead light, so we replaced the fan with a fan/light combo.  Also, we swapped out the bulbs in the vanity light from 40W soft whites to 60W clear bulbs, which made it a lot brighter.

Shower: Before these updates, it was SO DARK in my shower.  I had a navy blue shower curtain and a patterned plastic liner, so no light was penetrating.  But then...the kiddo managed to rip a hole in the shower curtain, so I figured a more sheer update would allow more light to get in. We also swapped out the shower head with a wide-head detachable model (because the detachable comes in handy for when we need to rinse the kiddo off quickly, or when we had our pup for giving him baths). 
Hardware: We swapped out the faucet, and the wall hardware, so that they were brushed nickel like the lighting fixture instead of chrome, and added cabinet pulls to the vanity doors.

Cost for this room: $860

Total cost for 3 bathrooms:  $1,830 ($1300 of which was the resurfacing of the counters and showers)

It's amazing how such small changes can make a huge difference! 

Wednesday, March 29, 2017

Pinterest Project: Basement Bar

So, we recently did a little DIY/Pinterest project in the basement of our new house. More "DIY" than Pinterest, since we really just used Pinterest more as a "pinspiration" than anything.  Yes...typing that word made me gag a little.  But anywho...I really love how it turned out.
So our new house, which I love, came with this weird alcove in the basement. I'm 90% sure that the previous owner had a bunch of bookshelves tucked into it, but I forget from when we did the walk-through.
The basement already has tons of storage (the doors to the right in this photo are our game closet), so using it for a closet didn't seem to make sense.  Reading nook was a possibility, but it's really dark right there, so that would require adding in some lighting.  It was too shallow for a play area (plus, as the kid gets bigger, I'm sure the whole downstairs living area will become his play area).

So, what to do with it?  Currently, the downstairs living area is our "movie room" (though we haven't made much use of it yet).  So it struck us to turn the alcove into a small "dry" bar (no plumbing in this area of the basement) for drinks and snacks.  This freed up some space in our dining room upstairs (which is where our wine rack used to be, but since our new dining room is a little smaller, there isn't really space).

So...where to start?

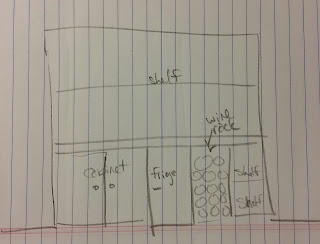
With a fridge, of course!  We found a black mini fridge on the FB Marketplace for about $40.  Therefore it seemed to make sense to focus our build around this.  I visualized the fridge, a wine rack, and a cabinet or two for closed storage that would potentially be lockable.  Then a countertop and some shelves above.

My initial sketch. Please ignore typos.

We priced cabinets at the big box home improvement stores, but everything was higher than we really wanted to spend, or was too tall/short.  So I would periodically visit the thrift stores near my office to see if there were any end tables that might work.  I finally hit paydirt-- $7 for this fiberboard laminated TV stand.  It was in rough shape and needed some love, but overall it was sturdy, and the doors were in decent condition.
The top and the casters made it considerably taller than the mini-fridge, so we just removed those.

Then, there was the wine rack issue.  Our existing wine rack was just about right as far as height, but the wrought iron detailing along the sides wouldn't allow it to fit in the space we had left.  I searched FB Marketplace and Craigslist, but could never find anything that would work (or that hadn't already been snatched up, or the lister wouldn't respond, etc.).
Mid-process pic.  You can see how the current wine rack just isn't going to work.

I saw some pics on Pinterest showing wine racks made out of wooden crates, and had a "Eureka" moment.  We could find a crate that would work, and then use some plywood that we already had on hand to make an "X" shaped divider.  Brilliant!  Now...all I have to do is find a crate that fits the space!

...whiiiiiich was harder to accomplish than originally thought.  Everything seemed to either be too narrow or too short--but if it was too short, stacking two would make it too tall. *sigh*  So, I went to DIY Project Mecca:  Hobby Lobby.  After much searching through the store with my tape measure in hand, I found a large crate that measured 14 inches wide by 29 inches tall.  It was a little short for what we needed, but I knew we could work with that.

Meanwhile, the Hubs took care of finding the countertop and the shelves.  We recently got a Menards, and they were running Grand Opening sales, so we got some great deals on white-laminated MDF, measuring 8 feet wide--just a bit wider than the alcove's opening.  The countertop had to be notched to fit, but I think the Hubs did an amazing job.

So then...we had a dark brown laminate cabinet, a black fridge, and a light brown crate.  Guess it's time to paint!

The interwebz told me I should probably sand the laminate cabinet and then prime it.  But I am lazy.  So instead, I found black satin spray paint that would adhere to laminate.  The project took about 3 cans, which were $5 each.
We waited for some beautiful weather, and then spread out a drop cloth in the back yard, weighted it down with rocks, and I went to town. (I also painted some of our outdoor fixtures while I was at it.)
Overall, it took 2-3 coats. And I probably SHOULD have scrubbed the laminate at least a bit before starting--I think the previous owner had used some sort of oil-based polish on it at some point, so the paint didn't adhere great to the doors or front edges, but the rest looked pretty good.  In order to save on paint, I only painted the surfaces that would show--there was no point to do the sides that are hidden in the alcove. So I just wrapped onto the sides a bit.  And I only did part of the shelves as well, so that I could put down patterned contact paper instead for some fun detailing.
We used some pieces of 2"x4" to shim up the difference in height between the cabinet and the wine rack, and painted those black as well.
Once everything was coated evenly and was dry, we put it all into place, and then added the counter and shelves.  I decorated them with things that had been on our old wine rack and other miscellaneous bits and bobs. 
We also added a glass rack to the lowest shelf so we could hang wine glasses out of the reach of our little one.  Finally, we bought 6 puck lights at Home Depot to add some light, since this corner is really dark.  
All in all, really happy with the result.  It works perfectly for what we need, adds a little "wow" to the basement, and just seems like a smart use for the space.  Also--we don't spend a ton of time in the basement right now, so I kinda like that I have to earn my calories for a beer/soda/glass of wine by  going up and down the stairs. It also keeps the sodas a little more out of reach, so they're not just there to grab in our kitchen fridge.

Overall cost:
Fridge: $40
Cabinet: $7
Wine Rack: $30 (originally $49.99, with 40% off coupon)
Paint: $15
Counter: $17
Shelves: $2
Brackets: $18
Glass Rack: $12
Lights: 22
GRAND TOTAL: $163


Saturday, December 6, 2014

Ornaments!!!

I had a pretty productive today today…of course, not like “cleaning the house” or “mowing the yard” productive.  Instead, I made two new ornaments for our fabulous new Christmas tree.  Yup—I finally got to upgrade from our little scraggy 5-foot tree, to a beautiful, full, PRE-LIT-WITH-1000+-LIGHTS tree that I got at a thrift store for $100.  SO happy.

IMG_6316

Well, when you add 2.5 feet to your tree…you need more ornaments, amirite?  Not that I don’t already add to my ornament collection annually.  Or have a bunch of Eeyore and Marvin the Martian ornaments that I don’t even put up anymore since I switched tree themes.  But..I mean… come on… PINTEREST.

So I started the morning with a cup of coffee, and the fixings for a button ornament:

- styrofoam ornament (48c at WalMart)

- pearl-ended straight pins ($1.97 at WalMart)

- and LOTs of buttons (free, from my mom’s button collection)

IMG_6322

Instructions not really necessary on this one—you start with one button, add another… stagger colors & sizes and layer when appropriate to fill in the white spaces.

IMG_6323

IMG_6346

And then, I wanted to do my own take on the “book pages” ornaments.  I didn’t have any old sheet music, but I do have this random old Catholic Missal from 1966. I’m not 100% sure where it came from—either I picked it up at a thrift store or it came from a box of books at my Nana’s house…either way, it’s been sitting on a shelf in my house, unused, for several years.  So I fugured I might as well put it to good use.

IMG_6356

Here’s hoping you can’t go to hell for cutting up a 50 year old liturgy.

  IMG_6361

I pulled a few pages from the Advent, Christmas Vigil & Midnight Mass liturgies, and cut out poignant bits that referenced Christmas.

 IMG_6363

Then I took a blank paper ornament (60c at Hobby Lobby) & used Modge Podge to adhere the paper to the ornament, turning the pieces at different angles and trying to get good coverage (while making sure lines that I really liked didn’t get too covered up).

IMG_6367

When it was fully covered, I did one final thin layer of Modge Podge, and sprinkled it with glitter.  Let that dry, and then I took it outside & sprayed it with a clear coat (to help the glitter not fall off).

  IMG_6375

IMG_6379

I’ve got a few other blank paper ornaments, so I might make a few more of these. I love the way it turned out!

And then, to wrap it up, I re-vamped this wreath.  Last year, I hung it on our front door, and the neighborhood birds thought the beautiful berries were real—so they pecked it to death.  I’m hoping no birds were harmed permanently.  So this year, I snipped off the sprigs with damaged berries, and then added all the pine cones & some extra greenery & cinnamon sticks. (Oh, and hung it indoors this year, so no birds would be at risk.)

 IMG_6386

Monday, August 5, 2013

Dog Bingo.

 AKA:  And now for something else completely un-food related.

I created this lil’ number the other day after having “one of those days” where my furry four-legged child was REALLY trying my patience. 

2013-08-03 22.18.34

See that focused intensity?  Dad’s posing for a pic, while the Pugster is thinking “must. eat. game. dice.”

(And for those who are thinking “WTF game is that?”  Click here.)


I found myself wondering, “does he just have an AGENDA or something?  Like—’these are the things I have to accomplish today for my life to be complete’.  Like…DOG BINGO!”

BINGO

So, now you too know your dog’s ultimate purpose in life: to get ‘Bingo’ every day.

You can’t fool us, canines.  We’re on to your wily ways.

Wednesday, September 12, 2012

Fleur de Lis Art.

I’m jonesing for a new fleur de lis art print for our kitchen/dining room area (really, honestly: we have 1300 sq ft of living space—those rooms are one & the same).  I know I’ll probably end up making something, thanks to my Pinterest addiction, but I’ve been perusing the InterWebz for some inspiration. 

This one is so cute it makes my heart ache:

“Fleur de Lis” by Ryan Merrill…actually, I may buy this print, I love it so much!


This metal work is also gorgeous:

If I could find a trivet that looked like this, I would be quite pleased.  Because art that is also functional makes me happy.


This set of four is quite lovely, too, although I think I’m looking for something a bit smaller, since we already have a large focal piece in our dining room

Set of 4 16 x 16 Fleur de...

…of course, I could just split them up and spread the fleur love around the house. :D


I don’t usually go for metallics, but there’s something so regal about this one…


I think I may try to recreate something like that, using the “glue, aluminum foil, & shoe polish” craft that’s trending on Pinterest right now.