Showing posts with label halloween. Show all posts

Saturday, February 17, 2024

Sourdough Discard Pie Crust and Vegetable Quiche

 If you've known me for a while, or read this blog for a while, you know we do a murder mystery party near Halloween each year in honor of our friend's birthday. This year's theme was A Knight of Murder, and my character was Poor Pearl, the peasant baker.  So I decided to bake up a "vegetable tarte" for our feast, using sourdough discard in the crust.

I used Little Spoon Farm's pie crust recipe; unfortunately I think I overworked the dough because the crust ended up slumping when I did the pre-bake.

Pre-slump.

For the filling, I used:

  • 1 Tbsp butter
  • 1/2 white onion
  • 4 oz mushrooms, sliced
  • 1 Tbsp garlic
  • 4-5 eggs
  • 1/2 cup half & half
  • 1/2 Tbsp of Adjika Georgian seasoning
  • 1 cup frozen peas
  • 1 cup cheese of your choice (I used shredded smoked gouda)
DIRECTIONS:
  1. Par bake the crust for 15 minutes at 425F, then remove.
  2. On the stovetop, sauté onions, garlic & mushrooms in the butter until soft, then place in the pie crust. Add cheese, then peas to the crust.
  3. Mix the eggs, half & half, and Georgian seasoning in a medium bowl and whisk until beaten. Pour over the vegetables & cheese.
  4. Bake at 350F for 40-50 minutes or until eggs are set.
Serve with many other amazing Medieval themed dishes whilst among friends dressed in period-appropriate garb.
Lord Taylor & Lady Gwendolyn, our fair hosts for the evening's festivities. (They literally have the BEST basement for hosting events like this.)

Many good times were had by all, and The Hubs & I were neither murdered nor the murderers.  And everything was DELICIOUS. Huzzah!
Poor Pearl the Peasant & Sir Cameron the Red Knight


Saturday, November 2, 2019

Victorian Hat & Costume DIY - A Wild West Murder Mystery Party

Our friend Amy hosts a murder mystery party every year for her birthday (which is right around Halloween).  Over the years, I've been a 1950's housewife, a 1920's flapper mob daughter, a Governor's daughter surrounded by pirates (a la Elizabeth Swann), a "Downton Abbey" style housekeeper, a fairy princess, and a 1980's prom-goer.  Coming up with a costume for the party is literally one of my favorite times of the year.
   
So this year's theme is "Murder at the Deadwood Saloon", set in the Wild West of 1874.  And my character was "Holly Hickock", a Southern belle / professional poker player.  The character description called for "fancy dress"...

...so I guess not selling this old bridesmaid's dress in our recent garage sale was a blessing in disguise! I spent some time Googling "Western Victorian era women's outfits" and eventually settled on a plan:

I had the dress, some black lace leftover from my prom outfit the previous year, a choker style necklace, and tall pointy boots that could pass for Victorian era.   I ordered black lace fingerless gloves from Ebay, along with a black lace fan (not shown in the drawing).

I found this video for how to make a quick "no sew" bustle to make the dress poof out a bit in the back, and bought a bag at the thrift store that would work for $3.50. Stuffed it with some lightweight material (a poofy underskirt from last year's prom outfit).  Pinned the black lace to the dress to make shoulder straps (since strapless dresses weren't common for the period, and it added some accents to the dress).

But the hair accessory...what to do?  I knew I could easily get a feathered hairpiece from Ebay, or a fascinator....but I kinda wanted to MAKE something.  I absolutely love the hats the ladies wear in the movie Tombstone, particularly the character of Josie:

...but finding something inexpensive was proving difficult:  ready made period-piece hats were $50-80, and most DIY hat sites were still using relatively professional tools and supplies that I knew would add up quick.  Other DIY sites recommended using a child's size hat so that it would sit on top of the head (rather than fitting around the crown), as is typical of the period's style.  But even then--the base for the hat was going to be $8-9, plus the cost of trimmings.

Finally, I found one website that shared something that appeared pretty easy--just some fabric, ribbon, and flowers over a cheap hat frame.  But then I couldn't find a link to the hat she'd used.  And at some point, The Hubs looked over and said, "I think you could make that with a Cool Whip container and some cardboard"...And I realized he was right.


SUPPLIES:
Small Tupperware bowl (or Cool Whip container)
Thick cardboard from a small box (I used an empty diaper box)
Tape measure
Real or makeshift protractor
Scissors
Box cutter or Exacto knife
Hot glue gun
Double-sided tape
Fabric
Ribbon
flowers/feathers/baubles for decoration

DIRECTIONS: Trim up one side of the box, and then use the tape measure to draw a line from corner to corner--this shows the center of the box.  Then use your protractor to draw a circle around this central point (this made about a 9 inch circle for me).  Double check with the tape measure to confirm it's about the same distance around--retrace in areas if you need.  Then trim off the outside edges.  This will make the brim of the hat.
Next, place your container on the cardboard, and use the tape measure to make sure you're centered.  Hold the bowl down firmly, and trace around the outside edge.  
Use the Exacto knife to trim out the central circle (do this on a cutting board so you're not gouging into a table or countertop). As shown above, this created about a 2 inch brim for the hat.
Add the bowl, and voila--you have your hat frame, for $0!
Next, you'll need fabric to cover it.  Find something that matches your outfit--in this instance, since I'm using an existing dress I don't have any "leftover" fabric to use, but I do want a sash for my dress, so I can make the sash and the hat out of the same fabric in order to tie the two together.
I've had this orange & gold shot silk in my craft room for years--made a vest out of it for The Hubs' costume during the Pirate murder mystery party.  I love the colors so much, and the dress is neutral enough that I can make it work.  
Perfect for a fancy Southern gal, don't you think?
I started by putting a couple bands of double-sided tape around the outside of the bowl, and then laid the fabric over that, allowing for plenty of extra (which could later be trimmed or tucked up inside the hat).  Then I tightly tied the ribbon around the the bowl portion.  The ribbon and double-sided tape will both help the fabric to adhere to the top portion of the hat.

Then, because my bowl has a lip on it, I used hot glue to adhere the fabric to the top of that lip to help tack it in place (more than likely, I'm going to want to use this bowl again in the future, so I chose hot glue, rather than something like spray adhesive.)

Then I started wrapping the fabric around the brim of the hat, creating some pretty folds/pleats as I went, and secured that fabric to the bottom of the cardboard brim with hot glue.  I used safety pins to help hold the pleats in place so I could come back through later and sew them down. 
After sewing, I used some additional hot glue on the inside of the bowl to help hold that fabric inside. (In retrospect, I should have saved the inner cardboard circle from making the brim--I could have pushed it into the bowl to help keep the fabric taut.  Live & learn...)

Then the question became..."How the heck to I make this thing stay on my head???"  Especially since I wanted it to sit forward on my head a bit, like the picture of Josie above.  The answer?  Hair combs!  I picked up a pack and then stitched two onto opposite sides of the interior of the hat, so I could push them into my hair, toward each other, and keep the hat secure.

Once I felt confident I could get this beast to stay on my head, I flipped it back over and busted out my trusty glue gun--we need some flowers up in hurr!!!

I found a nice fall bouquet at Hobby Lobby--I picked a bunch with a nice array of different flowers so I could take them home and see what worked--and then still have a really nice fall decoration for our kitchen table.

Since the hat is small, there was only room for a couple flowers...I mean really, I probably could have gone nuts having seen some of the crazy hats that were around during that time....but I decided to keep it a little subtle. Then I sewed the extra ribbon from the band into a bow at the back, and voila!
The sash for this was also quite a project.  If I would have JUST made a sash, it probably would have been way simpler...but I had quite a bit of this gorgeous fabric leftover...and it was fairly common for gals of the time to have lots of layers and frills and ruffles.  So...I decided to add some EXTRA to this dress.

I knew the weight of the extra fabric in the back would pull at the sash, so I wanted to make sure it would hold up well throughout a party.  It occurred to me that using an existing belt would work well.  So, I wrapped the fabric around this elastic belt (pinned it until I was ready to sew).
For the back ruffle, I laid the fabric out flat on the floor, and the started folding pleats along the top, and pinning them together as I went.  Then I pinned the ruffle to the sash.
I ironed the sash portion to get a good seam along the top and bottom edge, then sewed the bustle to the bottom flap of the sash.
Then used hem tape to adhere the sash to itself around the belt.  Finally, I hemmed the edge of the bustle to hide the rough edge, and voila!

All the pieces came together to make a lovely old-timey fashionista southern belle....who was not terribly integral to the story of the evening.  
I mean...when your "big secret" that you have to hide from everyone is that you're not *really* from the South... You're probably not going to play a huge role in the evening's performance.  That's OK though.  We had a blast, and the Hubs won Best Dressed for the evening!  

Monday, November 7, 2016

Adventures in Parenting: 13 Months

Another month, another post!

1. Halloween.  Last year, he was too little (3 weeks old) to grasp the concept.  This year...he still doesn't, but he was at least a willing participant.  (i.e, we let him grab the candy, but Mom & Dad are still the ones eating 99% of it.)
His favorite thing? A balloon they gave out at our church event.  
Blurry babies are happy babies.

2. Molars, yo.  Lil' Man hasn't really ever had a rough time with teething...until molars.  Molars are the devil.  They take FOR-EV-ER to come in, and trouble him the whole time. He's a drooly, fussy, fevery hot mess.

3. New Classes at Day Care.  A spot opened up in the Ones classroom when he was 1y2w, so we moved him up (even though he'll be moving to a totally different day care once we're able to finally move into our new house).  Here, he has to eat off plates, drink from a sippy cup (no bottles), sleep on a cot instead of a crib, and be surrounded by 7 other kids who already know how to walk and run circles around him.
So far, he's done amazingly well--he takes THREE HOUR naps.  On a cot. It's crazy.  He hasn't been doing as great with the sippy cups--he'll drink from them, but not finish it, so he's not getting a ton of fluids during the day, which has resulted in some [TMI] constipation issues.  

4. Still Not Walking.  And I'm okay with that.  He will develop at his own pace.  He's not going to college still crawling.    It's so hard to wait for the big milestones though.  Especially when you see other kids at the same age already THERE.  So here are some other milestones he's hit:

  • Initiating games of peekaboo with a blanket
  • Hamming it up for the camera
  • Throwing a ball to someone (and it actually getting really close to them)
  • Putting things into (and then taking them out of) containers
  • Dancing while holding on to the coffee table
  • Climbing onto the coffee table
  • Turning light switches on and off and knowing what they do (when he flips the switch, he immediately turns to look at the light)
  • Pointing at things and trying to verbalize (the dog and lights/ceiling fans are particular faves)
  • Pooping in the bathtub.


5. Talking.  Our son is a babbling fool--he loves to jabber.  But he still doesn't really use any "proper" words.  Again--not rushing him, I know he'll figure it out and one of these days he'll be following me around yelling "MAMAMAMAMAMAMAMAMAMAMAMAMAMAMAMA" and I'll be wishing he COULDN'T talk.  But I know that as a responsible parent, one of my jobs is to talk with my son as much as possible so that he learns new words and how to converse, etc.

Do you know how hard it is to be an introverted parent of a toddler?  It's actually really hard for me to force myself to talk to my son.  I just want to sit here and feed you and make faces at you and take pictures of you. I don't want to prattle on about "Would you like some blueberries?  Here, have some chicken.  How about some applesauce?  Do you like your blueberries?  Would you like some milk?  Mama bought it at the store just for you!  Do you see Rocky?  Yeah, he's eating the blueberry you just threw on the floor!  He's a good little helper dog.  Where's Daddy?  Where's Mama?  Do you want some more milk?  What do you see outside?  Do you see the tree?  There goes a car!  There's a bird in the yard!  Did you finish your chicken?  Do you want some more? Are you all done? Where's Rocky?  Can you show me? Can you point at Rocky? Is Rocky a dog? Did you eat all of your blueberries?  Yay, good job! Can Mama wipe your face? Then you can get down and go play!"  It's really...really...really hard.  But I do it. [Sometimes.] Because I love my kid.  I just have to be very, very conscious of it and FORCE myself to talk.


6. Hot Dogs.  He loves them.  This is a new discovery, since we rarely have hot dogs in our house.  And I'm a little disappointed in myself in regards to just HOW MANY hot dogs he's eaten in the last two weeks.  But it's protein, it's easy, we had a bunch of them leftover from a campfire gathering, and he devours them.   I foresee many more hot dogs in our future.
Blueberries cancel out hot dogs, right?

7. Frickin' Vaccines.  It's part of life, I get it.  And I get it if a vaccine makes a kid cranky and out of sorts for a few days right after the shots. I'm mentally prepared to be extra comforting and love on my poor little one for a couple days.  But to the people who developed the MMR (measles, mumps, & rubella) vaccine...WTH?  If you haven't been through it, here's the rundown--they get sickly symptoms two weeks AFTER the shot.  Just long enough for you both to forget that he got vaccines, so all of a sudden your teething kiddo has a fever and feels poopy and run-down and wakes up 6 times a night, and you can't figure out what's wrong, until somewhere around 1am when you're half-asleep and you hallucinate remembering your pediatrician telling you "yeah, if he starts feeling bad about two weeks after the shot, that's probably what it is."  Thanks. I mean, I'm glad he's not going to get measles and all...but still.  I can't remember something my doctor told me two weeks ago. Send me an email reminder.

SOAPBOX:  I don't have a lot of anti-vax friends, but I still have *enough*.  Look--I respect your decision, whatever your reasoning, to not vaccinate your kid(s), even though I don't agree with you.  Please have the grace to do the same.  I made my choice because the people who developed those vaccines dedicated their adulthood, 8+ years of their education, plus however many years of residency and research, to the selfless mission of saving the lives of children and adults, and I would feel pretty arrogant to say, "no, I know more than you do, so I'm opting out."  Because I don't.  They went to school for it, I didn't.  I'd be pretty annoyed if a random person came in off the street and decided to try their hand at MY job.

And the argument of "well, my kid never got vaccinated and they've never been sick" doesn't fly...
a) your kid, who's only ever been exposed to your OTHER kids, hasn't yet gotten measles, mumps, or chicken pox?    Congrats, you've proved that herd immunity works in the small scale.  Try sending them to day care for a week.  
b) Vaccinations aren't going to keep my son from getting sick.  He's still going to come home sick from time to time, because there's no vaccine for the cold, bronchitis, giardia, hand-foot-mouth disease, ear infections, etc. That's part of life, and building his immune system. Vaccinations are going to keep my kid from getting something that could KILL him. (Or in the case of chicken pox, at least prevent the both of us from being completely miserable for 2 weeks--seeing as how his father & I would have to take turns staying home from work with him while he's out of day care.)

8.  At some point, your child may lick a toilet bowl plunger before you have a chance to stop him.  Just...Fair warning.

Monday, October 29, 2012

Halloween 2012: A tale of the Toxic Chef & her Glowing Ooze Pie.

Apparently I’m just addicted to costumes that glow.  A couple years ago it was my not-so-toxic oozy-boozy drink.  This year, after floundering for weeks trying to conjure up a costume idea, I decided upon a marriage of my real job, and my bloggy-job. And thus, the “Toxic Chef” was born.

I found a chef hat at Party City for $3, and an apron for $2 at a thrift store.  But the piece de resistance for this costume would be a glowing ooze pie.

A “toxic torte”, if you will. *ba dum CHING!* (Yes, yes, I am a HUUUUUUUGE dork.)

But first…we accessorize our hat & apron, lest someone think I was just a “normal” chef.  So I created this:

toxicchef

And then used adhesive fabric printer sheets to print & attach it to my hat and apron.

Then…the apron needed some “oomph”.  It just looked too NEW.  This was remedied with a spray bottle and some water tinted with green food dye, to show green “oozy” splotches all over.

Originally, there were also plans to create a liquid latex chemical burn for my arm as well…but I just ran out of time.

And now…the pie.

hallow12 021

Ingredients: (NOTE: This pie is 100% INEDIBLE.)

Aluminum pie tin

Aluminum foil

4 glow sticks (preferably green)

Slime (4 oz clear glue, 1.5 c water, 1 tsp borax, food coloring)

Salt dough pie crust (1 C flour, 1/2 c salt, 1/2 c water)

Cinnamon or bronzer (to “paint” the crust)

Gloss clear spray paint (optional)

Hot glue/glue gun


Directions:

1. Make your slime.  Mix the Borax with 1 c of the water & stir until dissolved.  Then in a separate bowl (glass is best, so you won’t stain your bowl), mix the glue, 1/2 cup of water, and food coloring together until uniform.

hallow12 003

Pour in the Borax mixture, and you will see globules start to form immediately.  Stir with the spoon for about 30 seconds to combine, and pretty soon, you’ll have this:

 hallow12 010 hallow12 012

Hooray polymer science!!! (If doing this activity with kids, here’s a great explanation of why this works.)

Collect all the bits of slime, then drain the bowl of the excess liquids.  You can set this aside in an airtight container until you’re ready to compile the rest of your pie.


2. Crust:  Preheat the oven to 250F.  Combine the flour, salt, and water & knead until thoroughly combined.  On a floured cookie sheet, roll out to the size of your pie pan, place the pie pan on top as a template, and cut around.  THEN, remove the pie plate and cut a circle about 1 inch in—you’re making the “lip” of the crust that will sit on top of the pie pan.  Remove the interior dough & re-roll out.  Cut into strips with a pizza cutter, and then place on the circle of dough to create a lattice top (weaving the strips over & under).  Once you’re done weaving, press the edges into the outer crust well.

 hallow12 016

Place this in the oven for about 2 hours.  You’re not “baking” it, just drying the dough out so that it will harden.  Once the crust is dried out, remove from the oven and dust with either cinnamon or bronzer makeup to give it a golden appearance.  Use a large spatula to gently remove the crust from the pan & transfer to a sheet of wax paper.  If you like, you can then spray the crust with a clear gloss sealant to give it a light shine (it will also keep the cinnamon or bronzer from rubbing off).


Now it’s time to assemble your pie.  Wad up aluminum foil inside the pan, about 3-4 layers should do it, because your slime will only fill about the top 1/2 inch of the pan.  Snap your glow sticks and place them on top of the foil.  Then stretch out your slime and lay it over the top (NOTE: Slime is very forgiving.  If you need, you can break it off into pieces, and then lay across the top.  As long as they’re touching, the pieces will meld together as it sits.)

hallow12 014

Heat up your glue gun, and then attach the crust to the edge of the pie shell in a couple places so it doesn’t shift.

hallow12 018 Pie: Pre-Glow

And again, once the glow sticks had been activated:

 hallow12 026

Now—head off to your party!!!

halloween12

The Toxic Chef & her ostrich-ridin’ husband.

We had a great time with our friends, munching on delicious goodies and laughing at each other’s costumes (watching a guy in an inflatable sumo costume try to get up from the couch never gets old, FYI).  We had “Troll 2” playing in the background…and then afterward watched the DOCUMENTARY about Troll 2 called “Best Worst Movie” (because we’re nerds like that).

Later we held a “Potions” contest where we concocted elixirs from various decoctions, and then named our potions and described what they would do. 

hallow12 024

The winners were “Martin Luther Kanine” which could allegedly cure racism in dogs (did I mention we had our dogs at this party?  We collectively own 5 small dogs.  And apparently, shih tzus and pomapoos don’t like pugs.  Or Boston Terriers.  And Boston terriers don’t like ANYBODY)…

hallow12 020 (…’specially pugs with glasses. Sheesh.)

…and the “Copulatus Concoctus” which causes the drinker to make sexual innuendos out of EVERYTHING.  The “Nilbog Juice” touted the ability to cure E.D. and AIDS…too bad it tastes too awful to drink.


Hope everyone has a fantastic & safe Halloween!!!

Thursday, August 23, 2012

Thirsty Thursday: Early Halloween Edition.

Have you noticed that the Holiday Influx is already upon us?  On Pinterest, in the retail stores, on the radio…  I can understand the Halloween costumes…I mean, kids just went back to school with crabby teachers and neverending piles of homework—they NEED something to look forward to.  When you’re back to hitting the books, daydreaming about whether Bane or Batman would yield better results for purloining your neighbors’ candy stashes is just a given.

But apparently the retailers are also already getting geared up for HoHoSeason.  Just. Too.  Soon.  I believe in giving every holiday its due.  And I do love me some Halloween.  So back off, Christmas.  After we gorge ourselves on turducken in November, you can have your turn.

Back to the holiday at hand. Halloween can be as much for adults as kids…and usually is.  You get to dress up like whatever you want, and no one says a thing?   Normally you have to pay a fortune for Comic-Con to get that privilege.  Living in a college town, I see my share of, “why yes, this lingerie IS a Halloween costume—can’t you see my animal ears?”

http://thongsnotflipflops.files.wordpress.com/2011/11/mean-girls-halloween.gif

Frankly, I’ve never quite prescribed to that school of thought, because, well, I like to be comfortable, and not freeze my butt off.  (Sidenote: Okay, except that one time when I was a bartender in college. But when you’re working for tips & not candy, it’s a slightly different ball game.  And for the record, I did TRY to be nerdy about it…)


Drunk customer #1: Nice outfit…are you the devil?

Me: Actually, I’m a succubus.

Drunk customer #1: *blank stare*

Me: …female demon that visits men in their sleep to steal their soul?

Drunk customer #1: *raises an eyebrow*

Me: …was the Medieval medical explanation for why men had wet dreams?

Drunk customer #1: …thanks for the drink.

Drunk customer #2:  Nice costume.  You the devil?

Me: *sighs*  Yes.  Yes, I’m the devil.


ANYWAY, a couple years back, I decided to hit up a friend’s All Hallow’s Eve party as a mad scientist.  I borrowed a lab coat from a friend who didn’t care if I singed it a bit, wore a nerdy tee & jeans (again: COMFORT is key), an official looking badge (my TWIC card, which is expired and has never ACTUALLY been used for any official purpose, but it’s got a microchip, so it looks cool), gunked up some rubber gloves, snagged some safety goggles from work, and after a bit of magic with some black eyeshadow:

halloween 027_2

(note: to get the “something just blew up in my face” look, put the goggles on, then use a large powder brush to apply black eyeshadow around the edges of the mask.  Remove the glasses, and voila!)

I was pretty proud of this entirely-free, thrown-together costume.  But I was doubly-enamored with my drink holder, and the concoction within.

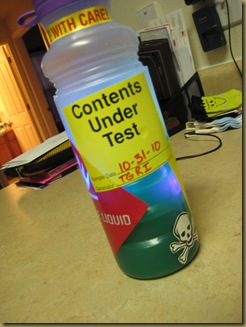
halloween 002 halloween 004

Okay.  So that’s only SOMEWHAT impressive.  Just kinda funny, right?  Haha, she found some labels & made some green juice and wrote “TGRI” on her bottle. Meh.


…Did I mention it glowed?
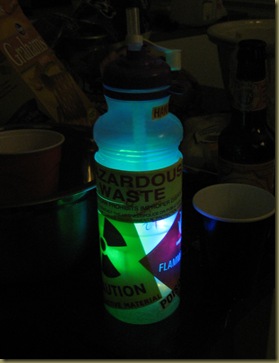
halloween 019

I know, I know.  Your mind is blown.  I’ll wait while you recover.

This is SUPER easy AND pretty cheap for you to replicate on your own.

Step 1: Find a container.  I wanted something with a lid & a straw that could look SOMEWHAT like a scientific container, but that the labels would stick to easily.  The answer was this 29 cent water bottle from a thrift store (after being thoroughly cleaned & replacing the straw). FYI—I still use this bottle when I’m out riding my bike, and the looks I get are priceless.

Step 2: Labels.  Since I work for an emergency spill response company, I have easy access to them, but I’m guessing YOU do not.  Not to worry!  You can print your own for free, and then use clear laminating sheets or clear packing tape to secure them to your container.

Step 3: The glowing.  This can be achieved a couple different ways.  A: You could use 2-3 glowsticks.  But that made me a little nervous, and I was afraid the glow wouldn’t be bright enough.  So instead, I searched and waited and searched and waited & got a good deal (less than $10) for a set of 4 light-up ice cubes on Ebay.  They only light up when in liquid, and can be set to either blink or stay on constantly.

Step 4: The concoction.  I wanted green and oozey and toxic-looking…but still tasty.


Here is my recipe for: The Ooze.

1 part orange juice (adds some opaqueness)

1 part green apple Sour Pucker

1 part blue curacao

2 parts Diet Mt. Dew

2 parts white liquor (whichever is your favorite: rum, vodka, gin, etc.)*


*If you’re a non-drinker, you can omit the booze and still use this as an accessory for your costume.  The glow will still look super-wicked-awesome.


Mix well, as much as you’ll need. (I filled my bottle before heading to the shin-dig, and brought a 20 oz water bottle filled with refill).  This can be a little sweet, so if you have some sour mix or lime juice in your house, feel free to add it. 

Fill your HazWaste container, drop in your light-cubes, and then find yourself a dark corner to lurk in, where you can look mysterious and dangerous, drinking your toxic waste with a crazed look in your eye…

halloween 060

(My hubs/chauffeur.  Cuz that’s how this scientist rolls, yo.)