Showing posts with label breakfast. Show all posts

Monday, May 20, 2024

Cinnamon Peach Swirl Sourdough

 This recipe was born because we wanted strawberry jam.  ...I'll explain:  We only have so much fridge door real estate, which is where jams and other condiments live, of course. And we also have this sort of unwritten rule about not having more than two types of jam/jelly open in the fridge at once (probably because we need to make sure we have plenty of room for the 5-6 types of pickled things that also live in the door).  There was a new, unopened jar of strawberry jam in the pan but first we needed to use up a partial jar of peach jam that had already been in the fridge for a while.

I couldn't find a recipe for exactly what I wanted to do, so I modified a cinnamon raisin swirl bread I'd had some success with in the past.  The peach jam we had (used about half a jar, or 1 cup) was homemade, from my Aunt Betty, and was delicious, but I wanted some other flavor notes in there. So I mixed in some cinnamon, ginger, and nutmeg (to taste). I tried to spread the filling as thin as I could, but with chunks of peach in there, it wasn't perfect.

This got rolled up from right to left, taking plenty of time to make sure I was sealing the edges well, so that there wouldn't be much leakage. Then it went into a well-greased metal loaf pan.
One busted seam...not too bad! Used an egg wash to get a nice glossy, golden top.

This was fabulous toasted with a bit of butter, but some of the slices where the filling was thicker were a tad undercooked, and wouldn't hold up well enough to go in a vertical toaster (would be fine in a toaster oven).  My favorite thing we made with it?  Griddled BLTs.  The peach went so well with the smoky bacon and some pepperjack cheese.


Sunday, February 18, 2024

Lemon-Blueberry Sourdough Donuts (Belated Valentine's)

Putting Mardi Gras and Valentine's next to each other just about did me in this year.  First, I volunteered to make a sourdough King Cake and shrimp boil for the office Mardi Gras potluck.  And I had every intention of waking up early on Valentine's Day to make fresh donuts for my two favorite men.  BUT...then I got knocked out by a whopper of a cold. I spent half of Valentines snoozing and the other half sneezing.  


By Saturday I was on the mend, so I finally made discard donuts for breakfast.  Lil' Man wanted chocolate chips rather than blueberry, so I obliged with part of the batch. I also wanted to bring in some pink for Valentine's Day, so I made part of the batch with halved maraschino cherries, and a pink glaze. The below recipe is a variation off Farmhouse on Boone's base recipe. You'll need silicone donut molds to bake these in the oven.

INGREDIENTS: (makes twelve 3-inch donuts, or eight 4-inch donuts

  • 1/2 cup sourdough discard
  • 3/4 cup buttermilk (I keep buttermilk powder in the fridge for when I need it)
  • 1/2 stick (4 Tbsp) unsalted butter, melted
  • 1 tsp vanilla
  • 1 egg
  • 2/3 cup sugar
  • 2 Tbsp lemon juice (about half a lemon's worth)
  • zest of half a lemon
  • 2 cups all purpose flour
  • 1/4 tsp salt
  • 2 tsp baking powder
Fillings:
  • Frozen or fresh blueberries
  • maraschino cherries
  • chocolate chips

For the Glaze:
  • 1/2 cup powdered sugar
  • 1 tsp lemon juice
  • 1 tsp vanilla
  • 1-2 tsp milk (depending on your preferred thickness)
  • red food coloring (to make pink glaze)

DIRECTIONS:

  1. Preheat oven to 350F, and grease your donut molds.
  2. Whisk together the starter & buttermilk until smooth, then add the butter, vanilla, egg, sugar, lemon juice, and lemon zest, and stir until combined.
  3. Add the salt, flour, and baking powder and mix until just combined.
  4. Transfer the batter into a gallon-size zip lock or piping bag, and cut a hole in the corner/tip about 1/2 inch wide.
  5. Use the bag to pipe the batter into the donut molds, dividing equally between the molds (I used one 4-inch pan and one 3-inch pan).  
  6. Press the fillings into the donut batter (I put about 6-8 blueberries in each of the 4-inch molds, about 6 cherry halves in the 3-inch donuts). Press the fillings down into the batter to partially or fully submerge them.
  7. Bake for 17-20 minutes, or until tops are brown.
  8. Allow to cool in the pans for about 15 minutes, then transfer onto a cooling rack.
  9. While the donuts cool, make your glaze. I used the plain glaze on my blueberry donuts, and then added a couple drops of food coloring to make pink for the cherry & chocolate chip versions.
  10. You can optionally add some sprinkles--we had some heart shaped ones on-hand.

The lemon flavor in the batter & glaze worked well with all three variations.  It enhances the blueberry well, but is subtle enough to almost be unnoticed with the chocolate chip.  I had hoped it would create a sort of "cherry lemonade" flavor, but the cherries are too sweet and overpowered the other flavors. So if you wanted to do just a batch of the cherry donuts, I would recommend doubling the lemon juice and zest, and cut the sugar back to 1/2 cup.


Sourdough Cinnamon Raisin Bread

 Redemption!!!

After my fail with the cranberry cinnamon bread (that wouldn't rise and is more aptly described as "bagel bread", I decided to try again, but using the swirl to get the cinnamon in there.  This recipe from Clever Carrot sounded pretty fab, and I was very happy with the results.

My kitchen was a bit cold and I was short on time, so I decided to add 8g of active dry yeast to this version to make sure it rose in time.  I also mixed for 10 minutes in the Kitchenaid, rather than doing stretch & folds.
I don't think I've done an egg wash on one of my loaves before, mostly because it feels like a waste of the rest of the egg, but I gotta say, the shine it adds is really gorgeous. 
It also gave me a chance to use the bread slicer that The Hubs gave me for Christmas.  It's a little flimsy but gets the job done. I hadn't previously been pre-slicing my loaves before storing, but cutting bread while it's still fresh & room temp is way easier (and probably safer) than hacking into it later when it's been in the fridge, and it's fantastic when toasted with butter.


Monday, November 6, 2023

Sourdough Discard Chocolate Donuts!

I've been talking about wanting to make donuts with my sourdough for a while, so the Hubs gave me one of my Christmas gifts early: a 3-inch silicone donut mold!  I was pretty excited to try it out.  The original recipe I used was meant to make 24 donuts, so I cut it in half to make enough batter for 12... but then, when I started pouring, turns out it was just a little more than I needed to make six donuts. So either I was pouring heavy, or the original recipe was meant for a smaller diameter donut mold, or both.  I tinkered with this enough to be able to list it out as an original recipe (also, I did the conversions to grams so, you're welcome).


INGREDIENTS (makes 6-ish three-inch donuts):

  • 75g AP flour
  • 1 tsp baking powder
  • 1/2 tsp salt
  • 30g cocoa powder
  • 1 tsp instant coffee or espresso powder
  • 1/2 tsp cinnamon
  • 70g brown sugar
  • 60g sourdough discard
  • 120g milk
  • 1 tsp vanilla extract
  • 36g coconut oil, melted
  • 50g mini chocolate chips (optional)
Glaze:
  • 1 Tbsp powdered sugar
  • splash of milk
  • splash of vanilla

DIRECTIONS:

Preheat the oven to 350F.  Whisk together all the dry ingredients, then add in the brown sugar, sourdough discard, milk, oil, and vanilla.  Mix until well combined with no lumps, then add in the chocolate chips (if you like).

Transfer the batter into the donut mold (I opted to put a little cooking spray in mine, even though it's silicone, as a bit of insurance) using a ziploc bag as a piping bag. Put the mold on a cookie sheet for easier handling in and out of the oven.


Bake for 16-18 minutes, or until a toothpick inserted comes out clean.  Set the mold on a wire rack for 15 minutes, then flip and remove the donuts from the mold.  Once they've cooled for at least 30 minutes, you can make the glaze (the original poster melted chocolate chips to make a frosting, which would also be good) and add to the donuts.  Then eat!

Pre-glazing.

These had a very light, fluffy texture, less dense than cake donuts you would get from the donut shop or store. We saved back a couple to see if they would get more firm/less dense the next day. The glazed had definitely hardened them up a bit but the interior was still very fluffy.  I'm looking forward to trying out some other recipes with my donut mold! 

Next day donut.

Sunday, November 5, 2023

Sourdough Bagels

 Bagels are one of my favorite breakfast options--who doesn't want delicious carbs first thing in the morning!  I had never tried making them before, sourdough or otherwise. I generally just pick them up on sale, buy a container of whipped cream cheese (salmon if buying plain or everything bagels).  With my last bagel purchase, we went through the bagels faster than the salmon cream cheese, so I decided it was time to try my hand!


I used Farmhouse on Boone's recipe, (no modifications, so click that link for the recipe) which makes 8--perfect for a week's worth of breakfasts. I opted to make plain bagels, no mix-ins, but decided to top them differently: two plain, two with cinnamon sugar, 3 with everything bagel seasoning, and one with za'atar spice, which I love on naan or flatbread, so it stood to reason it would also be excellent on a bagel. (I was not wrong.)


These are super easy. I don't know if I'd go as far as to say "I'm never buying bagels again!" because I'm not an extremist and don't believe in absolutes, but I can say I WILL make these again at some point, the next time I'm craving bagels. I might try some add-ins, but maybe not--it's really easy to make one batch of plain and then season them differently. 


I would recommend going ahead and slicing these while at room temp after they bake. We store our bread in the fridge and these are VERY difficult to slice while cold.  But we could pop them into the microwave for about 10-15 seconds and then they sliced easily.  


Friday, August 11, 2023

Sourdough Pop-Tart Toaster Pastries

 I realize I just said in my last post that we needed to make fewer sweets with the sourdough discard...but I was craving pie crust, yet we didn't have enough eggs for a quiche or other savory option.  So...pop-tarts* it is. 

*I don't think I can get sued by Kellogg's, right?  Fine..."toaster pastries".  


I used Little Spoon Farm's recipe, with minor modifications:

  • we made a double batch because I needed to use up a lot of discard 
  • I used lemon juice in place of the vinegar (because we apparently don't own white vinegar)
  • No icing--I was running out of time so we just put cinnamon sugar on top after the egg wash
  • Filling: the double batch made 8 pastries, so we put strawberry jam in 2, peach jam in 3, and a mix of brown sugar & mini chocolate chips in the last 3.  The chocolate ones were the only pastries that didn't leak and weren't messy to eat, so if I did these again, I might make them all chocolate, possibly with marshmallow bits too.

Heads up--because the dough needs time to chill, DO NOT wake up at 7am and think you'll be able to make this in time before church at 9am.  I should have read the instructions better and made the dough the night before.  Learn from my mistakes. 


"S" for strawberry.

 These reheat in the toaster really well, though a few of them were almost too big--they wouldn't fit on their side and when put in the toaster vertically, the top inch or so still stuck out.  Aside from that minor issue, this was a pretty easy recipe and a good way to use up some discard, especially if you're craving pie crust. The original recipe calls for 25-30 minutes, but I found that 35-40 minutes in our oven got the best amount of crisp bottom and edges (had to bake them in two batches). I also recommend lining your cookie sheet with foil or parchment because the jam DOES leak out the edges.


Friday, July 14, 2023

Apple Crumb Cake with Sour Cream & Sourdough Discard

We were headed to a potluck with one of The Hubs' Homebrew Groups, and I needed something to use this week's sourdough discard in. We also had a container of sour cream that needed to get used up, and some of last year's apples from our backyard tree hanging out in the freezer.  When I searched the interwebz for a "sourdough sour cream apple cake"...I got a lot of "sourdough apple cakes" and "sour cream apple cakes"...but no crossover.  So--I found a couple different recipes I liked, mixed & matched, and this was the end result.


Note: This results in some of the measurements below being in grams, and some in dry measurements--this is because the sourdough substitution is based on weight, rather than volume--I removed 75g of flour and 75g of sour cream from the cake layer to make up for the addition of the 150g of sourdough discard.

INGREDIENTS:

Apple Layer:

  • 3 cups frozen or fresh sliced apples, peeled (sliced thin or cubed)
  • 2/3 cup sugar
  • 1 Tbsp butter
  • 1.5 Tbsp lemon juice
  • 2 tsp cinnamon
  • 1/2 tsp nutmeg
Cake Layer:
  • 1.5 sticks unsalted butter, room temp
  • 3/4 cup sugar
  • 170g sour cream (about 2/3 cup)
  • 3 eggs
  • 2 tsp vanilla extract
  • 150g sourdough discard
  • 240g all-purpose flour (should be a little shy of 2 cups)
  • 1 tsp baking soda
  • 1 tsp baking powder
  • 1 tsp salt
Crumb Topping:
  • 1 stick unsalted butter, melted
  • 3/4 cup flour
  • 1/2 cup quick oats
  • 1/2 cup brown sugar
  • 1/4 cup white sugar 
  • 2 tsp cinnamon
  • 1/4 tsp salt
  • 1/2 cup pecans, crushed
DIRECTIONS:
  1. Preheat the oven to 350F.
  2. In a medium saucepan, combine the APPLE LAYER ingredients and bring to a boil.  Lower the heat and let simmer until apples are very soft, around 20 minutes.  Remove from heat--it will continue to thicken as it cools.
  3. In a separate medium bowl, melt the butter for the CRUMB TOPPING, then add the remaining ingredients and mix with a fork until crumbly.  Set aside.
  4. Using a large bowl and hand mixer, or a stand mixer, combine the room temp butter and sugar and beat until fluffy. Then add the eggs, sour cream, vanilla, and sourdough discard and mix until smooth.
  5. Remove the bowl from the stand mixer and weigh the flour into the bowl, then add the salt, baking powder and baking soda. Place back on the mixer and blend until combined.
  6. Pour CAKE LAYER into a buttered 9x13 pan and smooth out.  Then add the APPLE LAYER onto the cake batter, and use a butter knife to swirl the mixture evenly into the CAKE LAYER.
  7. Add the CRUMB TOPPING layer evenly across the top of the pan, and bake for 40-45 minutes.
Cake Layer.

Apple Layer added & swirled in.

Crumb Topping added.


This works well as a dessert, or as a coffee cake for breakfast!


Saturday, June 10, 2023

Sourdough Stories #20 - Sausage Egg & Cheese Biscuit "Muffins"

What's this?  An original recipe!?!?  YUP.  Pretty proud of that fact.  I needed to use up a bit of discard, as well as some sausage left over from dinner earlier in the week (homemade wonton soup, which was fabulous, FYI).  And I figure if I'm going to try to pair my sourdough adventures with this blog, I jolly well need to post some actual original content, not just talking about other people's recipes and what worked & didn't.


I was very happy with how these turned out--crisp & flaky edges on the outside, tender interior and great flavor from the cheese & sausage. A perfect quick breakfast option.

INGREDIENTS: (makes 12 muffins)

  • 8 oz ground pork sausage, browned & drained, seasoned with black pepper
  • 100g sourdough discard
  • 1/2 cup melted butter
  • 1 egg
  • 1 cup milk
  • 2 cups all-purpose flour (275g)
  • 1 Tbsp baking powder
  • 1/2 tsp garlic powder
  • 1/2 tsp salt (omit if you used salted butter)
  • 2 cups of shredded cheese (I used a sharp cheddar)
  • 2 green onions, sliced (or 1 Tbsp dried chives)

DIRECTIONS:
  1. Preheat the oven to 375F.
  2. Brown the sausage. 
  3. In a large mixing bowl, whisk together the discard, butter, egg, and milk until well combined. 
  4. Add the salt, garlic powder, then the flour, baking powder, cheese and onions.  Stir until combined, but don't overmix.
  5. Use a scoop to portion into a greased muffin tin, and bake for 20 minutes or until the tops are nice & golden. 
  6. Remove from the tin to cool, and eat while warm.
  7. Cool any remaining muffins completely on the counter, and then store in the fridge for later in the week, or freeze if not planning to eat right away.


Sunday, May 14, 2023

Sourdough Stories #16: Mixed Berry Sour Cream Discard Muffins

 This is officially my new favorite recipe for using up discard.  Just gonna say that up front.  Just the right amount of sweetness.  In the rearranging of our freezer to make space for our 1/4 cow, I found a bag of frozen mixed berries.  Perfect for smoothies & muffins!  I also needed to use up some sour cream, so this seemed like an excellent opportunity.

The base recipe for the muffins I made is here, but I made enough modifications that I'll go ahead & post my recipe here.

INGREDIENTS:

  • 1 3/4 cup all-purpose flour
  • 1 tsp baking powder
  • 1 tsp baking soda
  • 1 tsp salt
  • 8 Tbsp margarine (like Country Crock)
  • 2/3 cup white sugar
  • 2 eggs
  • 1 Tbsp lemon juice
  • 100 g sourdough discard
  • 2 cups frozen mixed berries (tossed with 1 Tbsp flour)
  • 3/4 cup sour cream
DIRECTIONS:
  1. Preheat oven to 400F.
  2. Cream the butter & sugar together, then add the eggs one at a time, along with the lemon juice.  
  3. Gently fold in the sourdough discard.
  4. Mix in half the sour cream, then half the flour, then repeat.
  5. In a separate bowl, toss the frozen berries in 1 Tbsp of flour.  
  6. Fold the berries into the batter.
  7. Portion the dough into a muffin tin (made about 18 for me).  I love these silicone cupcake liners!
  8. Bake for 20-25 minutes or until a toothpick comes out clean.


Sunday, April 16, 2023

Sourdough Stories, Chapter 12: Cinnamon Rolls

I wanted to use some of my starter to make cinnamon rolls for Easter breakfast.  But not just any cinnamon rolls...AmyCakes cinnamon rolls.  Our friend Amy owned a bakery here in town up until a couple years ago when she decided to take a step back & focus on her family.  She's been sharing her recipes and tips on her website, including videos, which are so helpful and all of her baked goods are DELICIOUS (I took second place in an office-wide bake-off last year with her amazing coconut cupcakes.) I asked if she'd ever tried to make a sourdough version of her famous, award-winning cinnamon rolls, and she said she hadn't!  So I decided to take a stab at it.

I started with her mini-cinnamon roll recipe as my base, and read online you can convert any recipe to a sourdough version by replacing 1 packet of instant yeast with 1 cup of starter, and then subtract 1 cup of flour and 1 cup of water from the recipe, and then allow for double the rise times.

Y'all...WHEN OH WHEN am I going to learn that I need to use happy, fed, ACTIVE AND BUBBLY starter in my recipes?  Discard is fine for quick breads, but these are YEAST CINNAMON ROLLS.  But did I use fed starter? NOPE.  I gave this dough some starving, aggro Mandough and he just sat there and refused to rise.  Amy's recipe notes it should take about an hour for the dough to bulk rise.

This lump of pastry sat on my counter for 8 hours and barely grew at all.

*deep breaths* Okay...okay....fine.  This will be FINE, my inner narrative told me.  I prepped the brown sugar filling, sat out some butter to soften, and then popped the dough in the fridge to chill overnight.  I also don't have Instant Clearjel, which is one of Amy's secret ingredients for beautiful, stable, moist pastries & breads.  But, I figured I could manage without.

I woke up at 6am to finish prepping the cinnamon rolls.  The dough was nice and stretchy and rolled out easily. Aha! I said to myself (silently, because I was alone in the kitchen, everyone else was sleeping, and I'm not a crazy person), maybe this is still totally fine.

Next, I was supposed to spread a flour + clearjel + butter mixture across the dough.  BUT...I don't have Clearjel, and mixing butter w/just flour seemed weird.  So...I attempted to spread softened butter on the dough.  In little pats.  That then didn't actually want to spread around, so I was trying to smear it with my fingers.  This technique was moderately successful.

Now we add the brown sugar + cinnamon mix.  But...I think I made too much.  Not wanting to be wasteful, I did my best to use it all up, pressing it onto the dough + butter.  

Then it was time to roll it up into a giant snake, score it...

And cut it into 12 rounds, which were placed in a 9x13 pan. After brushing the tops with butter....I'm supposed to let it "rise" again for an hour.  During this hour, I had some coffee, did a crossword, played some SWGOH, watched my kid open his Easter basket...  The cinnamon rolls, meanwhile....did nothing.

At 7:30am, these went into the oven with a little prayer that they would be delicious and somehow magically poof up in the oven.  And they did, a little.  Nowhere near as gorgeous as Amy's, but given that we usually just have canned cinnamon rolls, they still felt pretty special.

To me & The Hubs, anyway.  To my son, who is 7, has no filter and zero appreciation for the effort it takes to MAKE FOOD FROM SCRATCH (or "scrap" as he would say)... that young man, who I birthed into existence, decided these were "yucky" and refused to eat them (at first).

But after 4-5 times of him calling them YUCKY at the top of his lungs...I took him aside into the bedroom to have a Heart Talk.

I told him that I had gotten up very early to make this special breakfast. I showed him the pictures on my phone (the same ones shown above), and talked with him about the process.  I told him it was hard and took extra time, but I did it because I love to make food for him and Daddy.  I asked him how he would feel if he spent a lot of time working hard on an art or science project at school, and then brought it home and I said it was "yucky" or "ugly".  He looked at me with big eyes and said, "Sad".  I said, "yes, it makes Mommy sad when you say the food I made is yucky, and hurts my heart".  He gave me a big hug and a kiss, and while it still took some prodding, he finished his cinnamon roll. We'll call that a win.

I will say...something about the way these turned out made them possibly tastier as leftovers? My best guess is that the excess brown sugar+cinnamon made them a touch too sweet that first day right after baking, BUT, when they're reheated in the microwave for 20-30 seconds, that excess brown sugar became nice and crunchy....sort of like the topping on a Panera Cinnamon Crunch bagel (which, coincidentally, is my FAVORITE bagel from Panera).  

I definitely plan to attempt these again with more active starter; I might also do a little less of the filling, and add a touch of vanilla to the glaze, as it's not in the original recipe and I really like how vanilla rounds out a powdered sugar glaze.


Wednesday, April 12, 2023

Sourdough Stories, Episode 11: Pancakes (Discard Recipe)

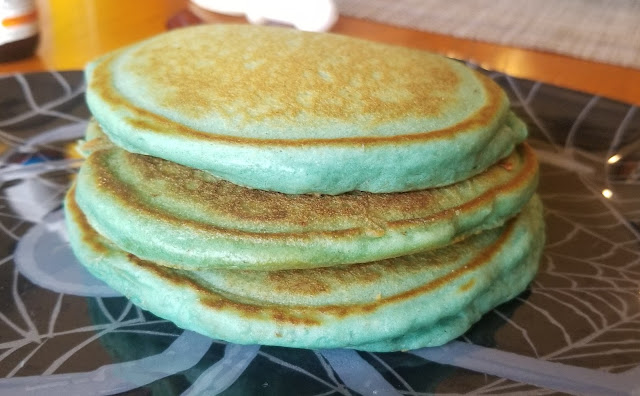
 The Hubs requested pancakes for breakfast.  Lil' Man requested that they be BLUE.  I, personally, like chocolate chips in mine.  Let's see if we can satisfy everyone.

It was a very busy Saturday: we had an Easter egg hunt to attend, needed to reorganize the freezer to make room for the 1/4 cow coming our way, attend my aunt's 80th birthday party...oh yeah, and FEED THE BEAST that is Mandough.  

Again, we turn to The Clever Carrot for a nice, easy recipe.  I made the "Same Day" option.  I made a few for The Hubs first (plain, but with lots of butter in the pan so the edges get crispy), then wiped out the pan a bit and made the chocolate chip ones for me...then added some blue food coloring to the last of the batter for the kiddo. AND those got chocolate chips as well. Because chocolate chip pancakes are THE BEST.  
Lil' Man loves these books. I can't make chocolate chip pancakes and not think of this image.


I can fit about 3 in my skillet at a time, so as I finished a batch, they got tossed into a 250-degree oven to stay warm while the rest cooked.  This made quite a bit of batter--we each had a stack of about 3, and then had a bunch left over, which I stored in the fridge for weekday breakfast (Just pop them in the toaster & you're good!)


These were fluffy and filling and served us well until lunch (a pork tenderloin sandwich & cherry shake from my hometown drive-up, The Dari-Kup).  And just in case you were on the edge of your seat waiting to find out....yes. We managed to fit all 226 lbs of cow into our now very organized freezer.

Before After